I'm excited to share some easy and budget-friendly nail art ideas you can try at home! Polka dots are playful and can be created with a simple dotting tool or toothpick. Striped designs allow for creativity and are quick to achieve using tape or a striping brush. Ombre techniques give a stunning gradient look with just a makeup sponge. For a little sparkle, consider adding glitter accents on the tips of your nails. Floral patterns, like simple roses or cheerful daisies, can also elevate your style effortlessly. Stick around, and I'll share even more fun ideas to brighten your nails!
Key Takeaways
- Polka Dot Designs: Use a dotting tool to create playful patterns with mixed dot sizes and vibrant color combinations on a budget.
- Striped Nail Art: Achieve creative stripes with a striping brush or tape, utilizing bold contrasts or soft pastels for a stylish look.
- Ombre Techniques: Blend two or more shades using a makeup sponge for a seamless gradient effect, enhancing nails with a magical touch.
- Glitter Accents: Add dazzling glitter to tips or specific areas using a small brush, ensuring a glamorous finish without overwhelming the design.
- Floral Patterns: Create charming floral designs with a simple dotting tool, using pinks for roses or whites with yellow centers for daisies.
Polka Dot Designs
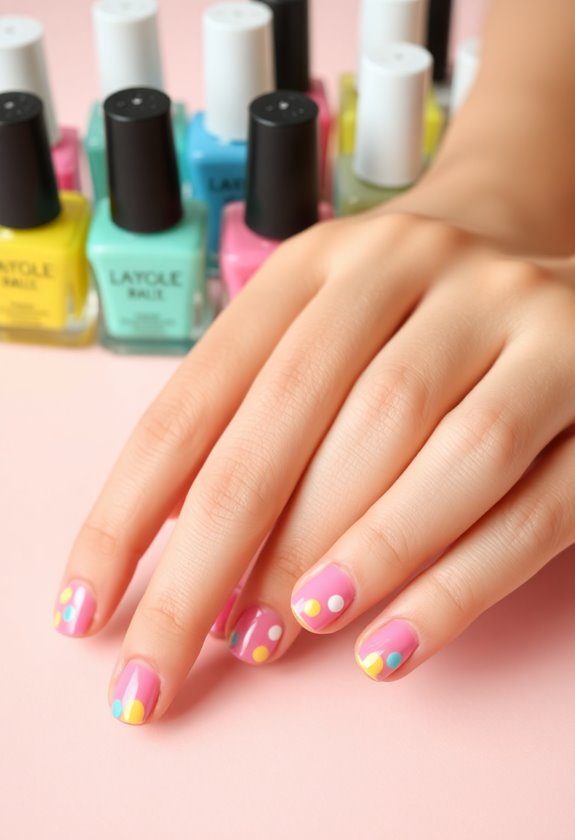
Polka dot designs are one of my favorite ways to add a playful touch to my nails without breaking the bank. They're so easy and fun to create! I love experimenting with different color combinations, like bright pinks with soft pastels or classic black and white. The key is to choose colors that complement each other, giving your nails a fresh and lively look.
When it comes to dot sizes, I've found that mixing small and large dots creates visual interest. Use a dotting tool or even a toothpick to achieve various sizes. You can keep it simple with a single color or go wild with multiple hues. Trust me, once you try polka dots, you'll be hooked!
Striped Nail Art
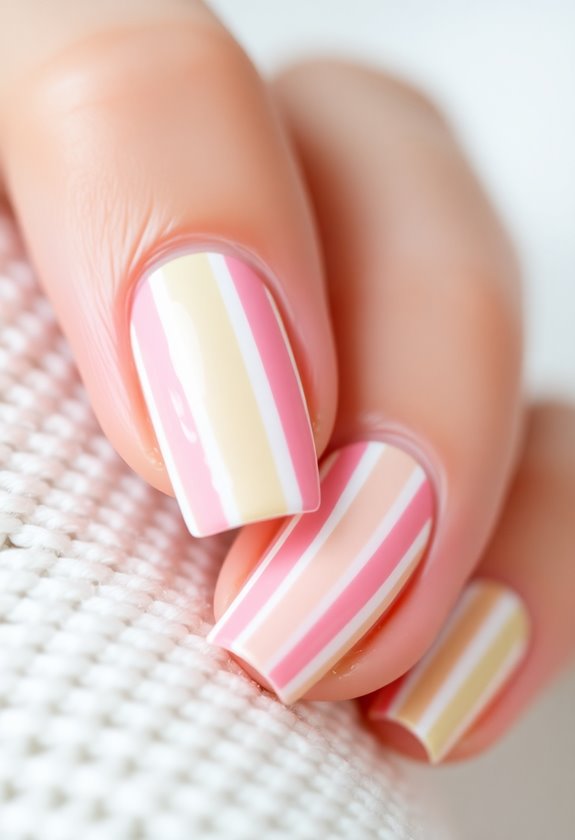
After enjoying the playful charm of polka dot designs, I find striped nail art to be another fantastic way to express creativity on a budget. The beauty of stripes lies in their versatility; I love experimenting with various striped color combinations. Whether I opt for bold, contrasting hues or soft pastels, the possibilities are endless.
Using striped nail polish, I can create clean lines with ease. A simple striping brush or even tape helps me achieve that flawless look. I often start with a base color and then add stripes in a different shade for a pop of interest. It's a quick and easy technique that always garners compliments, making striped nail art a must-try for anyone looking to jazz up their manicure!
Ombre Techniques
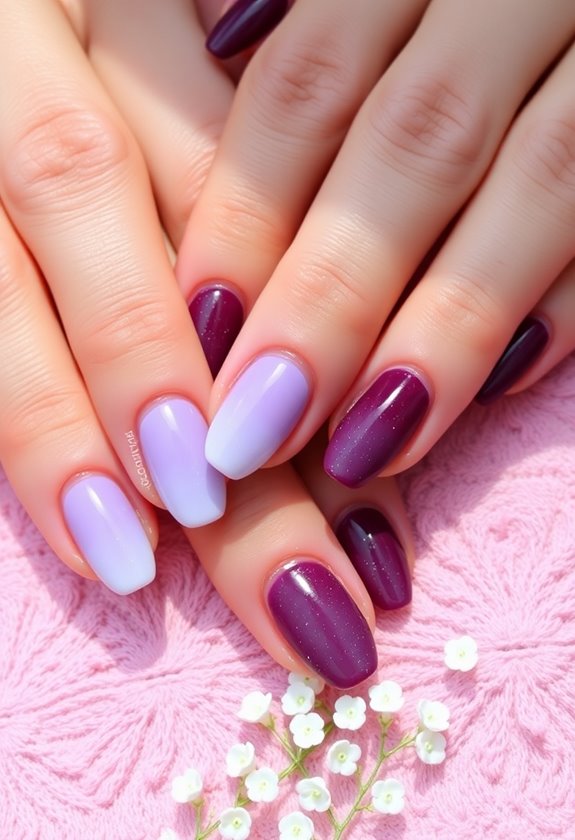
There's something magical about ombre techniques that instantly elevates any nail art look. I love experimenting with ombre colors, blending two or more shades to create stunning gradient styles. One of my favorite methods is the sponge technique. I simply apply the desired colors onto a makeup sponge, then dab it onto my nails for that beautiful changeover. You can use classic combinations like pink and purple or try something bold like teal and navy. For a more subtle look, pastels work wonders. It's all about blending! Once you've got your ombre down, seal it with a top coat to make it shine. Trust me, this budget-friendly nail art will have everyone asking where you got your nails done!
Glitter Accents
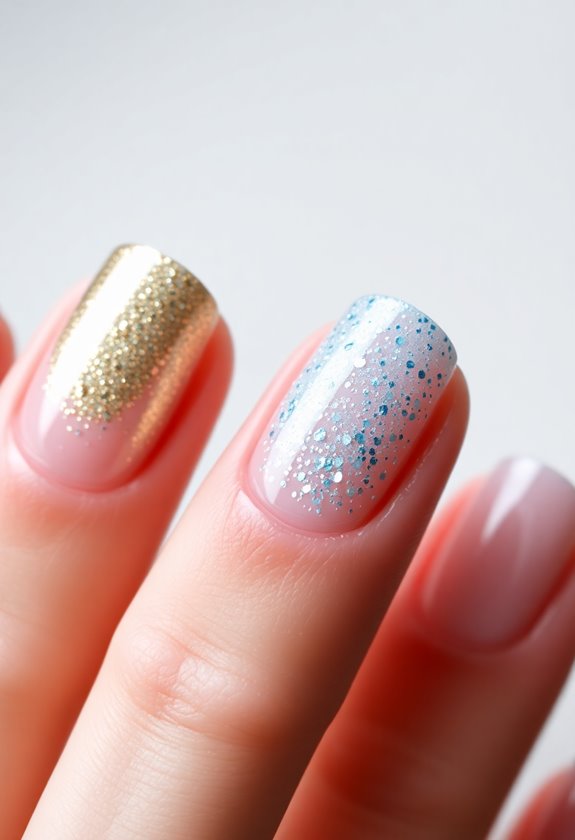
While ombre techniques bring a beautiful gradient effect to your nails, adding glitter accents can take your nail art to the next level. I love incorporating glitter gradients for a dazzling finish. You can easily achieve this by applying a base color, then using a makeup sponge to dab glitter on the tips for a soft, blended look.
For precise glitter placement, I recommend using a toothpick or a small brush to apply individual glitter pieces on specific areas of your nails. This method adds a touch of glam without overwhelming your design. Don't forget to seal everything with a top coat to guarantee your glitter stays put. With these simple techniques, your nails will sparkle without breaking the bank!
Floral Patterns
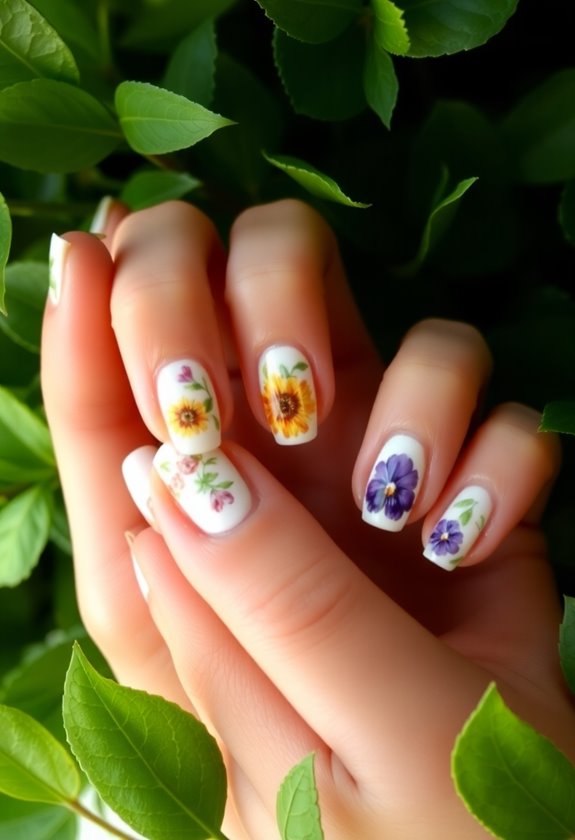
Floral patterns instantly brighten up any nail design, and they're surprisingly easy to create on a budget. I love using simple techniques to add some charm to my nails without breaking the bank. For a classic look, I often go for rose designs; just a dotting tool and a couple of shades of pink can create stunning results. You can easily layer the dots for depth, and it looks like you spent hours at the salon!
Daisy patterns are another favorite of mine. A white base with yellow centers makes for a cheerful vibe. Using a toothpick or a small brush, I simply create petal shapes around the center, and voila! With just a little practice, I'm able to rock these floral designs effortlessly.
Minimalist Lines

After experimenting with vibrant floral patterns, I often find myself drawn to minimalist lines for a sleek and modern look. This style embraces negative space and monochrome hues, making it perfect for anyone wanting an effortless yet chic manicure. I love how simple black lines on a nude base can elevate my nails without overwhelming them. Here's a quick guide to inspire your minimalist nail art:
| Style | Description |
|---|---|
| Thin Lines | Use a striper brush for precision. |
| Geometric Shapes | Create triangles or squares for a modern touch. |
| Accent Nail | Highlight one nail with a bold line. |
With these ideas, you can achieve a polished look while staying on budget!
Newspaper Transfer
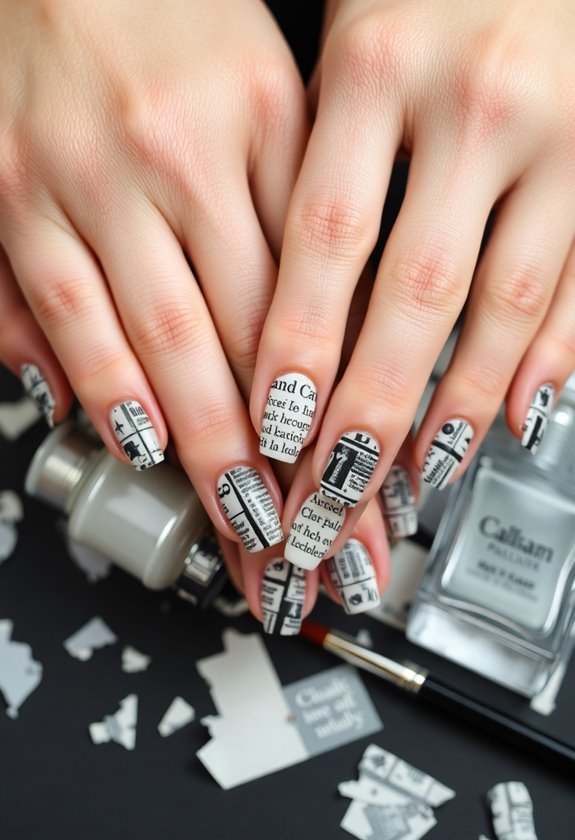
There's something uniquely intriguing about using newspaper for nail art, and I've found it to be an exciting way to express creativity on a budget. To achieve stunning newspaper designs, all you need is some alcohol, a base coat, and your favorite newspaper. First, I paint my nails with a light-colored polish and let it dry. Then, I cut small pieces of newspaper, dip them in alcohol, and press them onto my nails using transfer techniques. After a few seconds, I gently lift the paper to reveal the print! To finish, I seal everything with a top coat for longevity. It's a quick, fun way to achieve a chic look that always gets compliments without breaking the bank.
Color Blocking
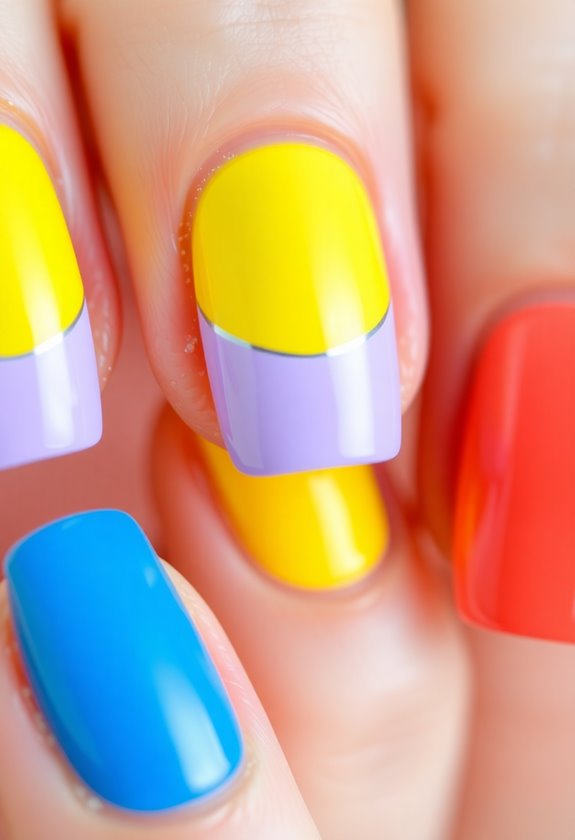
Switching gears from newspaper designs, color blocking offers another fun and vibrant way to express your style on your nails. I love how easy it is to create bold contrasts using just a few nail polish colors. By selecting two or three complementary color combinations, I can instantly make my nails pop.
For instance, pairing a bright pink with a deep blue creates a stunning visual effect. I like to paint each nail a different color or divide my nails into sections for a more dynamic look. The best part is that it doesn't require any fancy tools or skills—just a steady hand and a bit of creativity. So grab your favorite polishes and start experimenting with color blocking today!
Tape Nail Art
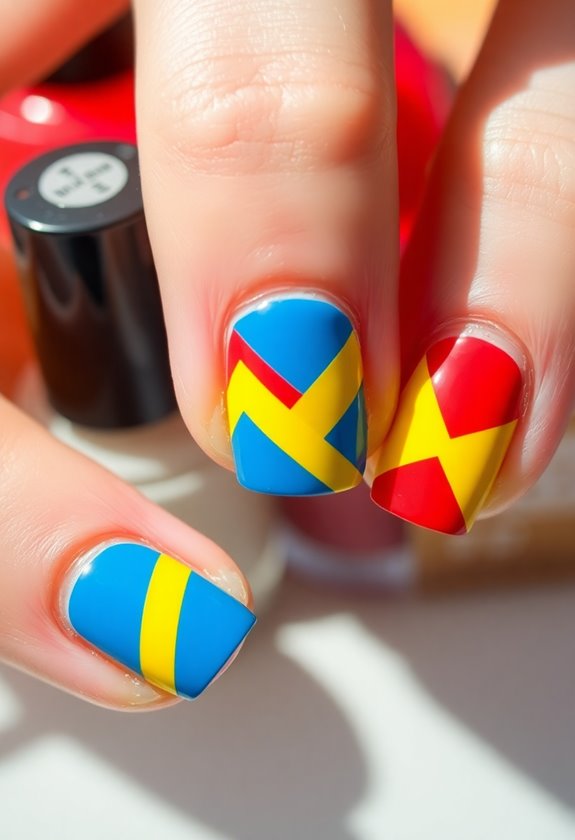
Tape nail art is one of my favorite techniques because it takes just a few simple supplies to achieve stunning results. With nail tape, I can create sharp lines and geometric patterns that look professional without breaking the bank. I love exploring different nail tape techniques, like using strips to form triangles or chevrons.
To start, I choose my base color and let it dry completely. Then, I apply the tape in my desired pattern and paint over it with a contrasting shade. After removing the tape, I'm always thrilled with the creative tape designs that emerge! It's such a fun way to express my style, and I can mix and match colors for endless possibilities. Give it a try!
Stamping Methods
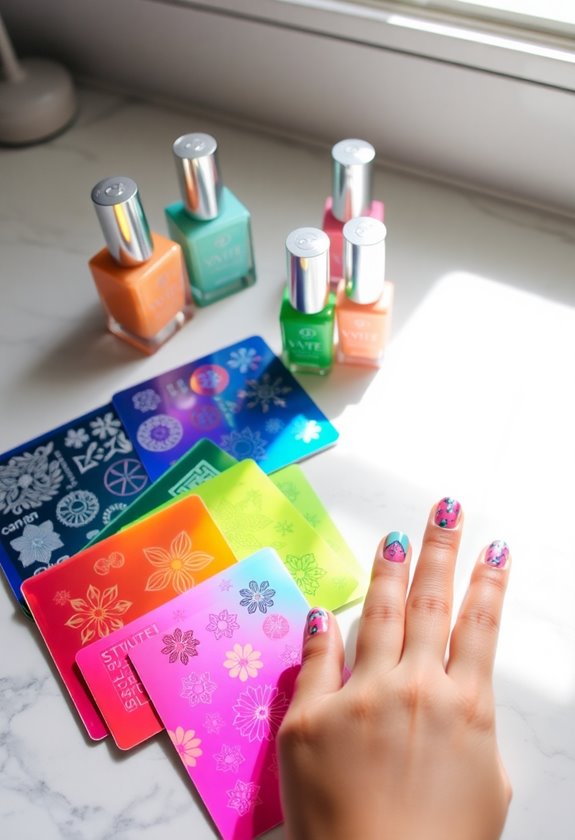
When it comes to adding intricate designs to my nails, stamping methods are a game changer. I love how easy it is to create stunning patterns with just a few tools. All I need are some stamping plates, a good quality nail polish, and a stamper. First, I pick a design from my stamping plate and apply a layer of nail polish over it. Then, I scrape off the excess polish and quickly press the stamper onto the plate, picking up the design. Finally, I roll the stamper onto my nail, and voilà! It's a quick way to achieve a salon-quality look at home without breaking the bank. Trust me, once you try it, you'll be hooked!
Frequently Asked Questions
What Tools Do I Need for DIY Nail Art?
You won't believe how simple it is! For my DIY nail art, I gather essential tools like dotting tools, brushes, and nail tape. These help me master various nail art techniques and release my creativity!
How Can I Make Nail Polish Last Longer?
To make my nail polish last longer, I focus on proper nail care. I choose quality polish types, apply a base coat, and seal with a top coat. Regular maintenance keeps my manicure looking fresh!
Are There Budget-Friendly Nail Art Kits Available?
I once found a fantastic budget-friendly nail art kit from Sally Hansen that included essential supplies like dotting tools and stickers. Their affordable brands really help me release my creativity without breaking the bank!
How Do I Remove Nail Art Without Damaging My Nails?
When I remove nail art, I prioritize nail health. I gently soak my nails in acetone, use a soft buffer, and avoid harsh scrubbing. These removal techniques keep my nails healthy and damage-free.
Can I Use Regular Paint for Nail Art?
I've tried using regular paint for nail art, but it can chip easily. Instead, I prefer nail paint alternatives. Creative techniques with proper nail polish give better results and last longer, keeping my designs vibrant.