If you want to create dazzling DIY nail art at home, you've got endless possibilities! I recommend starting with a good base and top coat for protection. From there, gather some quality nail polishes and fine brushes for detailed designs. I love playing with ombre techniques or using dotting tools for fun patterns. Nail stamping can add intricate looks effortlessly. Don't forget to prep your nails well and allow each layer to dry thoroughly for the best results. Ready to elevate your nail game? There's so much more to explore that'll inspire your next masterpiece!
Key Takeaways
- Start with nail care prep, ensuring clean and dry nails for better polish adherence and longevity.
- Use a quality base coat to protect your nails and enhance the vibrancy of your colors.
- Explore colorful gradient designs using the makeup sponge method for seamless blending effects.
- Try fun nail stamping techniques for intricate designs, layering colors for added depth and dimension.
- Finish with a top coat to seal your art and increase shine, allowing for adequate drying time.
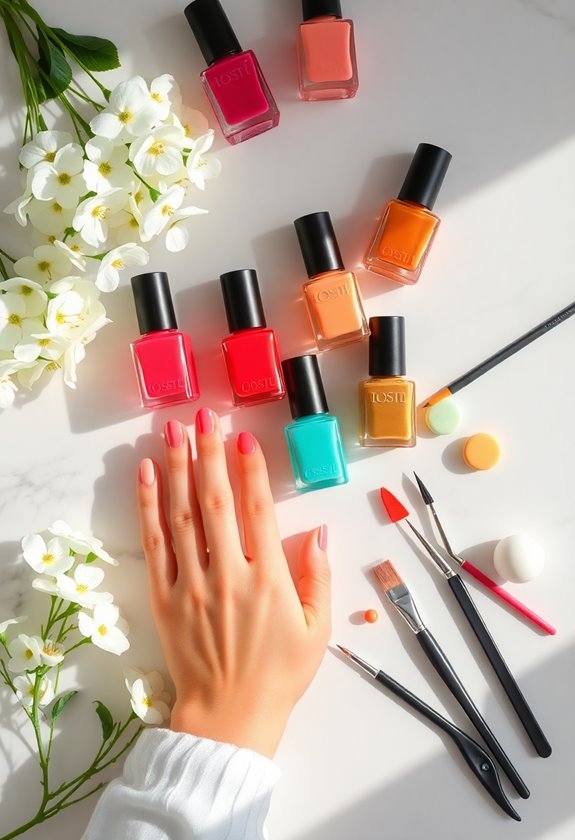
Essential Tools for Nail Art

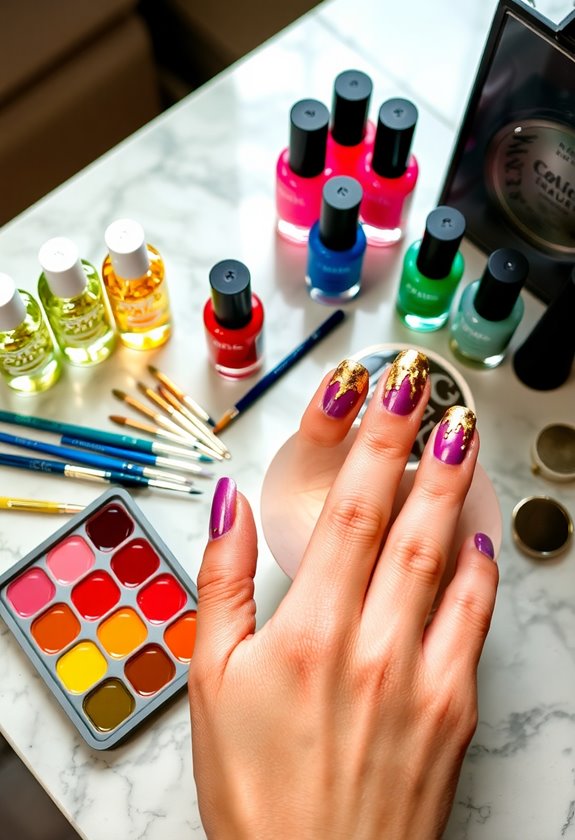
When I immerse myself in nail art, having the right tools makes all the difference. I always start with essential nail art supplies, like a good quality base coat, top coat, and a variety of nail polishes. A fine brush set is vital for detailed designs, allowing me to execute intricate nail art techniques with precision. Dotting tools and striping tape can elevate my designs, making it easy to create patterns or add accents. I also keep nail art brushes and sponges handy for ombre effects. Finally, I never forget my cleanup brush and acetone for those little mistakes. With these tools at my disposal, I feel empowered to explore my creativity and produce stunning nail art right at home.
Simple Techniques for Beginners
Getting started with nail art can feel overwhelming, but I've found that simple techniques can make all the difference. Focusing on nail care is essential—always prep your nails properly. One easy technique is using tape to create clean lines. Also, understanding color theory helps you choose complementary shades.
Here's a quick reference table for some basic techniques:
| Technique | Description | Tips |
|---|---|---|
| Dotting | Use a dotting tool for patterns | Vary dot sizes |
| Striping | Apply tape for stripes | Use contrasting colors |
| Sponging | Blend colors with a makeup sponge | Practice for smoothness |
| Marble Effect | Swirl colors in water | Work quickly |
| Negative Space | Leave parts of the nail bare | Choose a bold color |
These techniques can help you create stunning designs with ease!
Colorful Gradient Designs
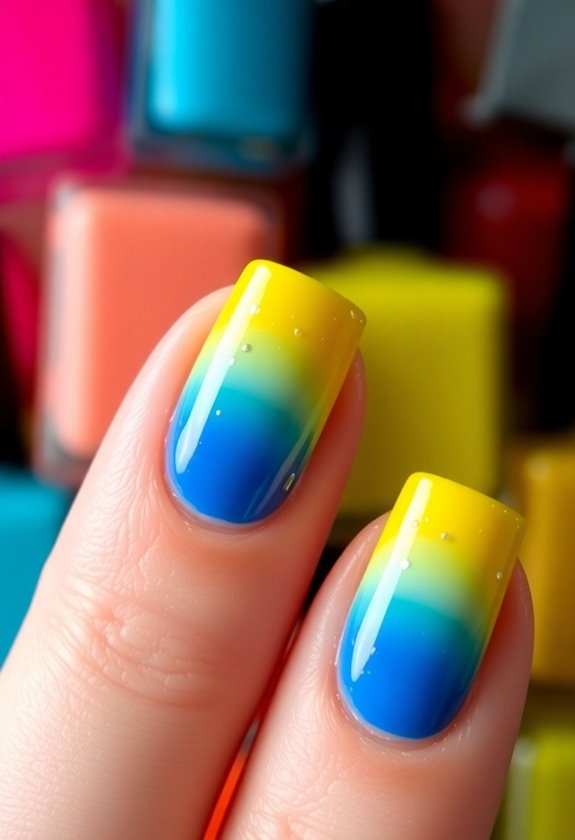
After mastering some basic techniques, exploring colorful gradient designs can really elevate your nail art game. I love using ombre techniques to create stunning effects on my nails. To start, I choose two or three colors that complement each other. Using a makeup sponge, I dab the colors onto the sponge, blending them slightly before applying it to my nails. This method allows for seamless color blending, giving that beautiful gradient effect.
I often experiment with different color combinations, from pastels to bold hues. Once I'm satisfied with the gradient, I seal it with a topcoat for a smooth finish. Trust me, colorful gradients not only look fabulous but also add a professional touch to your DIY nail art!
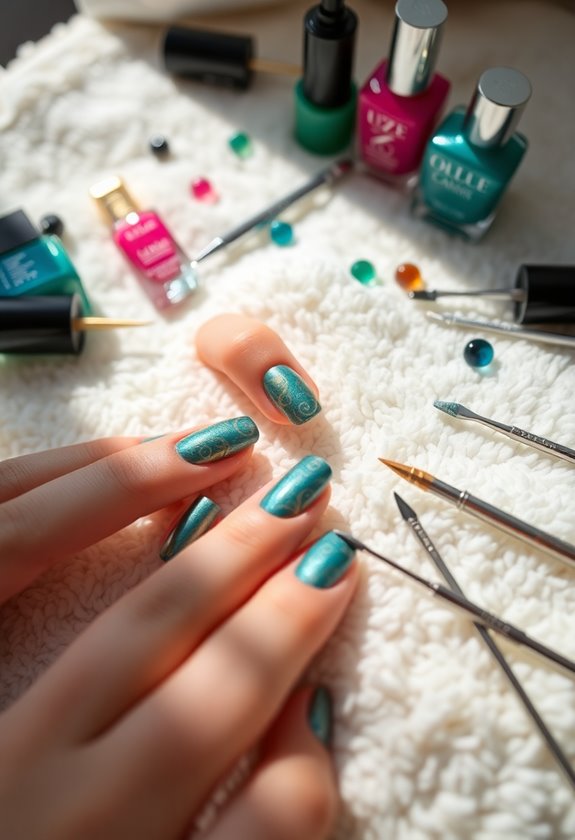
Fun Nail Stamping Ideas
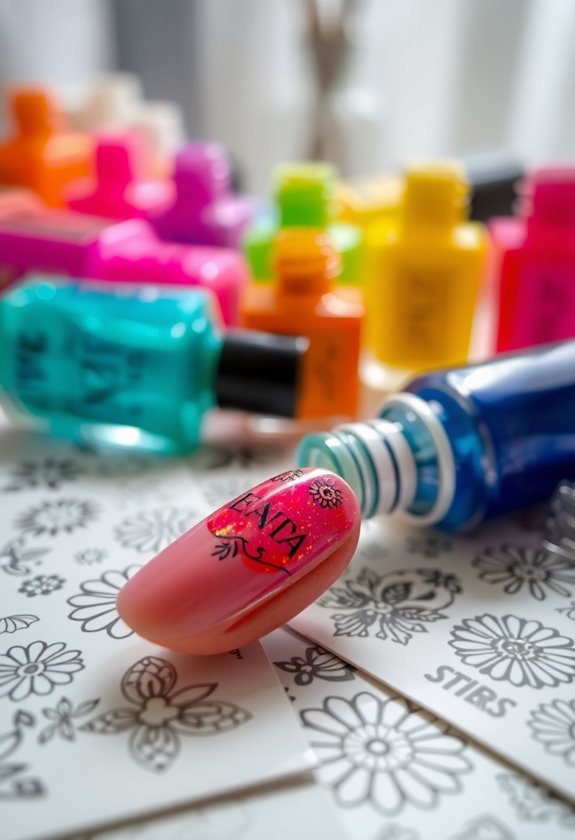
Nail stamping is a fantastic way to add intricate designs to your manicure without needing advanced painting skills. I love exploring different nail stamping techniques to create unique stamp designs that stand out. One of my favorites is using floral patterns, which instantly brighten up any look. I also enjoy layering multiple colors for a more dynamic effect.
For a playful vibe, I often reach for quirky shapes or fun graphics. It's amazing how easily I can transform a simple base color into something eye-catching. Plus, with various stamping plates available, the possibilities are endless! Whether you're a beginner or a pro, nail stamping lets you release your creativity and showcase your personality right at your fingertips.
Striking Geometric Patterns
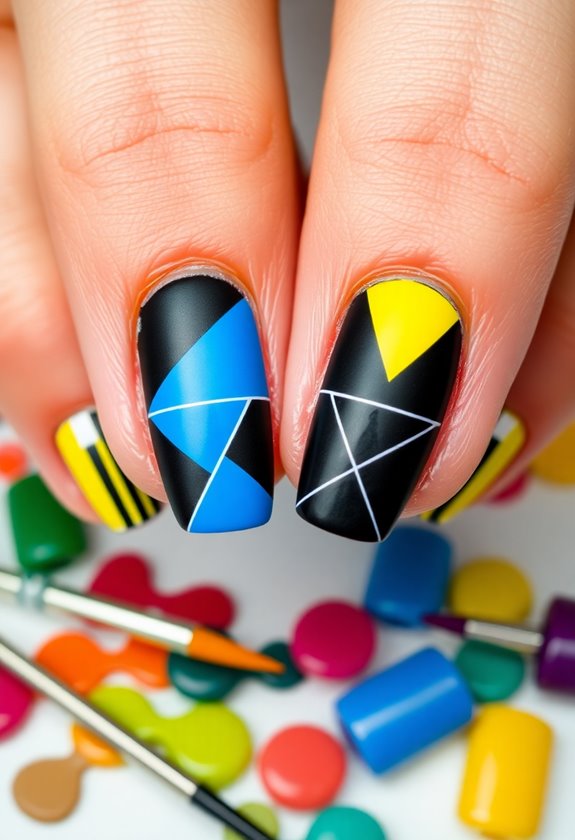
While floral patterns add a lovely touch to my nails, I've recently become fascinated by striking geometric patterns. There's something so enchanting about the clean lines and bold designs that really make your nails stand out. I love experimenting with geometric color combinations—think vibrant blues paired with crisp whites or soft pastels contrasted against dark hues. Using tape, I can create sharp edges and stunning abstract shapes that elevate my nail art game. Whether I'm opting for triangles, stripes, or intricate chevrons, each design feels fresh and modern. Plus, the best part? I can mix and match colors to suit my mood or outfit. Give it a try, and you'll see how easy it is to achieve eye-catching results!
Floral Nail Art Inspiration
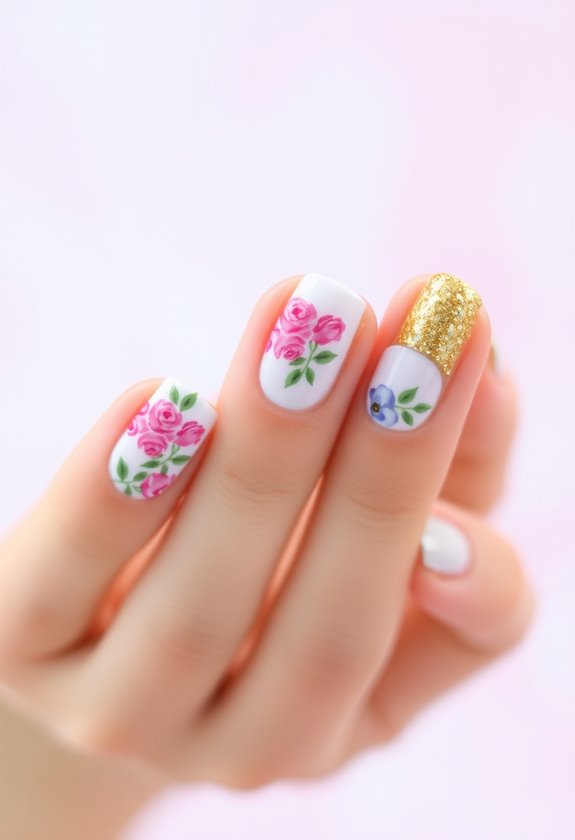
There's nothing quite like the delicate beauty of floral nail art to bring a touch of nature to your fingertips. I love experimenting with various floral color palettes, from soft pastels to vibrant hues, which can completely change the vibe of my nail art. One of my favorite flower shape techniques involves using a dotting tool to create petal shapes, giving my nails a whimsical, garden-inspired look. Whether I'm going for a classic rose or a playful daisy, these techniques are simple yet effective. I also enjoy layering different colors to add depth and dimension. Floral nail art not only looks stunning but also allows me to express my creativity and personality with each design. Give it a try!
Creative Use of Nail Wraps
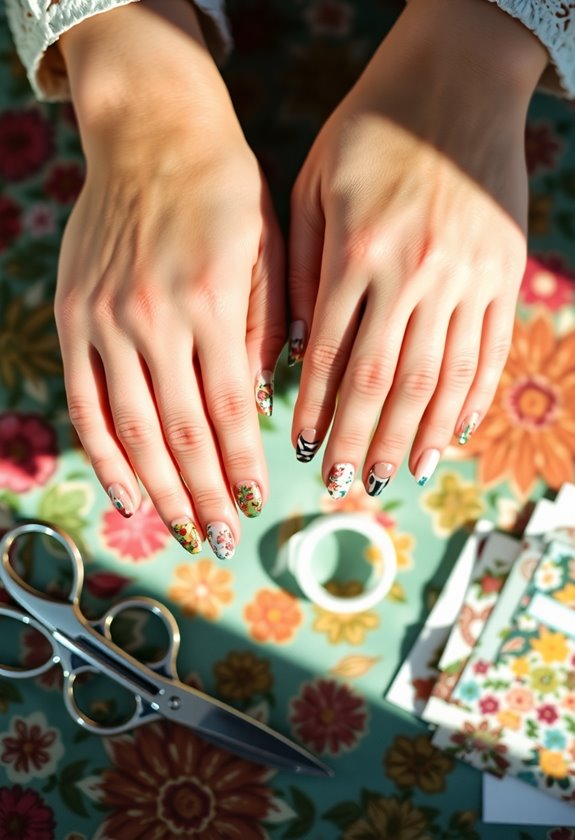
After exploring the enchanting world of floral nail art, I've found that nail wraps offer another fantastic way to elevate my manicure game. These wraps come in a dazzling array of innovative patterns and unique textures, making it easy to switch up my style. Here's how I creatively use nail wraps:
- Layering: I often layer wraps over a solid color for added depth.
- Accent nails: I apply a bold wrap on one or two nails to create a striking focal point.
- Mix and match: I love combining different wraps to craft a playful, eclectic look.
With nail wraps, I can achieve salon-quality designs at home, all while expressing my personality and creativity. It's a game-changer!
Seasonal Themes and Ideas

Embracing seasonal themes in my nail art keeps my manicures fresh and exciting all year round. I love switching up my designs to reflect the beauty of each season. For autumn, I create looks inspired by vibrant autumn leaves, using rich oranges and browns. Winter brings a winter wonderland vibe with sparkly whites and icy blues, perfect for holiday festivities. As spring arrives, I adore painting delicate spring blossoms in pastel shades. When summer comes, I channel those sunny summer vibes with bright, cheerful colors.
Here's how I like to categorize my seasonal nail art ideas:
| Season | Theme |
|---|---|
| Autumn | Autumn Leaves |
| Winter | Winter Wonderland |
| Spring | Spring Blossoms |
| Summer | Summer Vibes |
Tips for Long-Lasting Designs
Creating long-lasting nail art designs requires a combination of quality products and careful techniques. I've learned that focusing on these key areas can greatly enhance design durability:
- Nail Prep: Start with clean, dry nails. Proper nail prep removes moisture and oils, ensuring your base coat adheres well.
- Base and Top Coats: Always apply a good quality base coat to protect your nails and enhance color selection. Follow up with a top coat to seal your design and improve shine.
- Drying Techniques: Allow sufficient drying time between layers. Use quick-dry sprays or UV lamps to boost moisture retention and minimize smudging.
Showcasing Your Nail Art
Once you've perfected your nail art and guaranteed it's long-lasting, it's time to show it off. I love showcasing my creativity by sharing my designs on social media, where I can connect with others who appreciate nail art trends. A well-lit photo captures the details, so I make sure to find the perfect angle. I often join online nail art communities, which are fantastic for inspiration and feedback. Hosting a nail art party with friends is another great way to flaunt my creations and swap tips. Remember, your nails are a canvas that reflects your personality. So, don't shy away from wearing bold designs in public—each manicure is an opportunity to express yourself and inspire others!
Frequently Asked Questions
How Do I Remove Nail Art Without Damaging My Nails?
I've found that nail art removal can be gentle when using safe techniques like soaking in acetone or warm soapy water. Always take your time to protect your nails while enjoying the process.
Can I Use Regular Polish for Nail Stamping?
You might be wondering if regular polish can work for nail stamping, right? Well, I've tried various polish types myself, and trust me, only specific formulations yield the best results with stamping techniques.
What Should I Do if My Design Smudges?
If my design smudges, I quickly assess the situation. I always follow nail art tips for smudge prevention, like using quick-dry topcoat or letting layers dry thoroughly before applying the next—it's saved my designs countless times!
Are There Vegan Options for Nail Art Supplies?
When it comes to nail art, I've found a treasure trove of vegan polish and cruelty-free tools. They're not only kind to animals but also let my creativity shine without compromising my values.
How Can I Improve My Nail Art Skills Quickly?
To improve my nail art skills quickly, I focus on various nail art techniques and practice methods. Watching tutorials helps me refine my approach, and I dedicate time each week to experiment with new designs.